# Gift DAPP

All you need to know about the Rigel Protocol Gifting DAPP - Documentation

The Rigel Protocol gifting system on mainnet will allow users to win prizes and send gifts to other users. Other DeFi projects will be able to use this Dapp to reward their communities. Social Media influencers can drastically increase their follower base by sending rewards to their subscribers.

Users will have the chance to win different values of RGP tokens and other compatible tokens and purchase **"Spins"** as gifts to other users.

Defi projects can apply to utilize the Gifting Dapp to reward and promote their platforms among their own userbase and other crypto communities.

First of all, you will need to have your Web3 wallet connected to the Rigel Protocol platform. Check below for how to connect your wallet:

{% content-ref url="/pages/-MfZXJX8LgQyHLVzHhQ3" %}
[Connecting Wallet](/connecting-wallet-1)
{% endcontent-ref %}

![](/files/WnfzO63DKDvCzpFoufDH)


# Influencer User Tutorial

This tutorial will guide you as an influencer on how to use the Rigel Protocol Gifting DAPP.

Influencers will be able to use all the functionalities of our Gifting Dapp within their platforms and include their ERC-20 or BEP-20 tokens as rewards. A one-time fee of 10 $RGP will be charged for each Campaign.

For every Campaign purchased, the Influencer will receive as a Bonus a free post across Rigel Protocol Channels (Twitter and Telegram) which will increase dramatically the engagement from the community, meaning more traction.

### Influencer Reward Giver <a href="#project-reward-giver" id="project-reward-giver"></a>

### &#x20;Step by step Guide: <a href="#step-by-step-guide" id="step-by-step-guide"></a>

1. Open gift.rigelprotocol.com
2. Choose network: Ethereum or Binance Smart Chain
3. Connect wallet as shown on [Connect Wallet ](/connecting-wallet-1)page
4. Choose the *"For influencer"* tab and click on "Get Started"

<figure><img src="/files/iF60R1rhWJnYMuRDNJcS" alt=""><figcaption></figcaption></figure>

5\. Pay the 10RGP or buy RGP tokens so you can pay.

<figure><img src="/files/vLw2HqXuk6kbrE93GjgQ" alt=""><figcaption></figcaption></figure>

6\. Set up your profile to continue to the next step, when done click on "Save and Continue"

<figure><img src="/files/1TtQtU9cFfVsVwfaTXWV" alt=""><figcaption></figcaption></figure>

7\. Fill in *Influencer* details on the form provided and click on *"save and Continue".* &#x20;

![](/files/-MfZjxy7hPiSWFQrCpk2)

8\. List your social media links and verify game players follow you.

<figure><img src="/files/UFhEMgycA3Es42fBiOEt" alt=""><figcaption></figcaption></figure>

9\. At the *"Game Setup"* section, fill the form with the token rewards amounts intended for the campaign, choose the Spinning Wheel format (8 or 12 slots), the amounts on each slot and click on "Preview Spin" to see how the event will look like, or "Create Event" to let it go live.

![](/files/-MfZp3B0xBIQ9zqt22x9)

10\. You will be prompted to pay the service fee (10 $RGP) after clicking on "Create Event", click on *"Confirm"* and submit payment, after the transaction is confirmed by the network, a rewards panel becomes available

\
11\. You will be prompted from your wallet to confirm the transaction(s) as per the details submitted on the step above.‌

<figure><img src="/files/ZFWjSimupWch6XIk2UIC" alt=""><figcaption></figcaption></figure>

12\. After tx is confirmed, a dashboard page is created with a campaign-unique shareable link. Then you are all set to share this amazing Gifting Campaign with the world!‌

<figure><img src="/files/xOPRL4hvdbxFrT59Xrkv" alt=""><figcaption></figcaption></figure>

<figure><img src="/files/z6wyxloMGC26T0qJyryn" alt=""><figcaption></figcaption></figure>

<figure><img src="/files/462ivT8uA82tdgVC2EcL" alt=""><figcaption></figcaption></figure>

* Unspent tokens can be claimed back by the influencer after the end of the Campaign.

### Influencer Reward Receiver <a href="#project-reward-receiver" id="project-reward-receiver"></a>

### &#x20;Step by step Guide: <a href="#step-by-step-guide-1" id="step-by-step-guide-1"></a>

1. Open gift.rigelprotocol.com
2. Choose network; Ethereum or Binance Smart Chain
3. Connect your wallet as shown on the [Connect Wallet ](/connecting-wallet-1)page.
4. Click on 'events'. You will be led to a page shown below;

Please **NOTE** that when you connect to **Binance Smart Chain**, you will only be able to **claim rewards** from the **Binance Smart Chain** **network**. The same applies to the Ethereum Smart Chain. Once you get an error as shown below, please connect to the substitute network and try again.

5\. Click the claim button from which you will be required to input your Twitter and Telegram username. Again, confirm that you are following the influencer's accounts, that is, on Twitter and Telegram.

<figure><img src="/files/prUZWBHMxwqKX482vk37" alt=""><figcaption></figcaption></figure>

6\. Now you will be subjected to spin to claim your reward. The Gift claimed will be added to your wallet.

You can spin as long as you have available spins, to get more spins, click the get more spins button where you will be given your referral link to share or buy more spins. One referral earns you one spin.

<figure><img src="/files/fGUa3doIscTQKePzQpsV" alt=""><figcaption></figcaption></figure>


# Project Tutorial

This tutorial will guide you as a Project on how to use the Rigel Protocol Gifting DAPP.

Projects will be able to use all the functionalities of our Gifting Dapp within their platforms and include their ERC-20 or BEP-20 tokens as rewards. A one-time fee of 10 $RGP will be charged for each Campaign.

For every Campaign purchased, the Project will receive as a Bonus a free post across RigelProtocol Channels (Twitter and Telegram) which will increase dramatically the engagement from the community.

### Project Reward Giver <a href="#project-reward-giver" id="project-reward-giver"></a>

### &#x20;Step by step Guide: <a href="#step-by-step-guide" id="step-by-step-guide"></a>

1. Open gift.rigelprotocol.com
2. Choose network: Ethereum or Binance Smart Chain
3. Connect wallet as shown on [Connect Wallet](/connecting-wallet-1) page
4. Choose the *"For project"* tab and click on "Get Started"

<figure><img src="/files/fOy9XCKuE4Ahk0P8gSHE" alt=""><figcaption></figcaption></figure>

5\. Pay the 10RGP or buy RGP tokens so you can pay.

<figure><img src="/files/ok588HfUKoW6VfGtW5kF" alt=""><figcaption></figcaption></figure>

6\. Set up your profile to continue to the next step, when done click on "Save and Continue"

<figure><img src="/files/xofUjHDIR0JddUVbFQ8B" alt=""><figcaption></figcaption></figure>

7\. Fill in *project* details on the form provided and click on *"save and Continue".* &#x20;

<figure><img src="/files/mOIgGzCXW5CSi2uAt7Ua" alt=""><figcaption></figcaption></figure>

8\. List your social media links and verify game players follow you.

<figure><img src="/files/AqSuGBl523Rp65bupN3L" alt=""><figcaption></figcaption></figure>

9\. At the *"Game Setup"* section, fill the form with the token rewards amounts intended for the campaign, choose the Spinning Wheel format (8 or 12 slots), the amounts on each slot and click on "Preview Spin" to see how the event will look like, or "Create Event" to let it go live.

![](/files/-MfZp3B0xBIQ9zqt22x9)

10\. You will be prompted to pay the service fee (10 $RGP) after clicking on "Create Event", click on *"Confirm"* and submit payment, after the transaction is confirmed by the network, a rewards panel becomes available

\
11\. You will be prompted from your wallet to confirm the transaction(s) as per the details submitted on the step above.‌

<figure><img src="/files/33FXbuziu6HtsZgJcdDr" alt=""><figcaption></figcaption></figure>

12\. After transactions is confirmed, a dashboard page is created with a campaign-unique shareable link. Then you are all set to share this amazing Gifting Campaign with the world!‌

<figure><img src="/files/5WoO18DxbYo58IijZJY4" alt=""><figcaption></figcaption></figure>

<figure><img src="/files/YC4X5AzjfFhpECnzIo68" alt=""><figcaption></figcaption></figure>

Projects will be able to see on Dashboard their ended and ongoing campaigns and their progress as well as edit them.

<figure><img src="/files/gAemiTWvqDFOj7ZDrDPg" alt=""><figcaption></figcaption></figure>

* Unspent tokens can be claimed back by the Project after the end of the Campaign.

### Project Reward Receiver <a href="#project-reward-receiver" id="project-reward-receiver"></a>

### &#x20;Step by step Guide: <a href="#step-by-step-guide-1" id="step-by-step-guide-1"></a>

1. Open gift.rigelprotocol.com
2. Choose network; Ethereum or Binance Smart Chain
3. Connect your wallet as shown on the [Connect Wallet](/connecting-wallet-1) page.
4. Click on 'events'. You will be led to a page shown below;

Please **NOTE** that when you connect to **Binance Smart Chain**, you will only be able to **claim rewards** from the **Binance Smart Chain** **network**. The same applies to the Ethereum Smart Chain. Once you get an error as shown below, please connect to the substitute network and try again.

5\. Click the claim button from which you will be required to input your Twitter and Telegram username. Again, confirm that you are following the project's accounts, that is, on Twitter and Telegram and other social media platforms supported for verification by GiftDapp.

<figure><img src="/files/IasP6a40pRnSZYD4MCzT" alt=""><figcaption></figcaption></figure>

6\. Now you will be subjected to spin to claim your reward. The Gift claimed will be added to your wallet.

You can spin as long as you have available spins, to get more spins, click the get more spins button where you will be given your referral link to share or buy more spins. One referral earns you one spin.

<figure><img src="/files/6lkQOVbPOPtgLY0TgnCv" alt=""><figcaption></figcaption></figure>


# User Claiming


# Telegram Verification

![](/files/5HPPOENHZ4uctmXm0ldU)

Step 1 : Click on ***" Verify Telegram "***&#x20;

![](/files/Safs49byKBJ90GkybMao)

***Step 2 :**  Once this pop up appears **" Select your country and phone number "*** &#x20;

***Step 3 :** Click on **"Next"***

![](/files/PI1Dzx2r7aKSXUhI969m)

***Step 4 :** Go to your Telegram device which you are logged into and authorize Dapp.* &#x20;

![](/files/e3tDQxvviqnZP4ZHBXxo)

***Step 5 :**  Click **" Confirm "***&#x20;

![](/files/Y9cjVD4QsZVqzlmHuzqY)

***Step 6 :** If it is successful you get a message like this **on telegram.***&#x20;

![](/files/f3VJwAtETTyLXLOJM61R)

***Step 7 :** Click **"Accept"** and you are good to go on next section.&#x20;*&#x20;


# Twitter Verification


# YouTube Verification


# Discord Verification


# Reddit Verification


# User Actions in Video

Visuals of user journey

**Connect/Disconnect wallets**

{% embed url="<https://www.loom.com/share/8e636da5c4114b589b87ee14399d5f08>" %}

**Explore Events**

{% embed url="<https://www.loom.com/share/3a9d12127126458988b8b9c97419cc27>" %}

**Claim a Reward**

{% embed url="<https://www.loom.com/share/818e230f19504e1a9c4c64b5a3e55e97>" %}

**Create a Event**&#x20;

{% embed url="<https://www.loom.com/share/18de05945e0e4869aaf80e15c47a325f>" %}

**View/Edit Profile**&#x20;

{% embed url="<https://www.loom.com/share/bfc554b5bdad43acb94c4132d6f04953>" %}

**View/Edit Event**

{% embed url="<https://www.loom.com/share/d69386eee51d4aa6a5cbf18fabe459cf>" %}


# Connecting Wallet

This page will guide you through the steps in connecting your Web3 Wallet to the Rigel Protocol Gifting DAPP

Rigel Protocol allows users to connect directly to their platform through wallets with Web3 capabilities like Metamask and the Binance Wallet(Browser extension)

### Connecting Wallets to Rigel Protocol (PC): Using Metamask as a use case. <a href="#connecting-metamask-to-rigel-protocol-pc" id="connecting-metamask-to-rigel-protocol-pc"></a>

Metamask is the most common and convenient wallet for Desktop Computers (Browser). If you don’t have a MetaMask wallet yet, you can install the extension on your browser from here: <https://metamask.io/download.html>​

From the RigelProtocol page, click *“Connect To A Network”* and then the Network desired: Binance Smart Chain or Ethereum. Choose the MetaMask wallet from the options available and then *“Connect wallet”*. A popup window would appear showing your account, choose the wallet then click *“Next”* and “Connect”.

![Connect To A Network](/files/-MfZZMciYc-LAF5HKHVZ)

![Select Metamask](/files/-MfZZqtUxZQ2EfZiqAKx)

![Connect your Account (If you have more than 1 Account with Metamask)](/files/-MfWrDRGlSbrf5hYstp6)

Rigel Protocol allows users to connect directly to their platform through wallets with Web3 capabilities&#x20;

### ‌Connecting TrustWallet to Rigel Protocol (Mobile)

You can download TrustWallet to your device from here: <https://trustwallet.com/>​‌

Steps to connect:‌

1. In your Trust Wallet, press the four squares at the bottom of the screen, and then scroll down to *Dapps*.
2. If you can't find *RigelProtocol* from the list, just input the Rigel Protocol website address in the search form: [*https://www.rigelprotocol.com/*](https://www.rigelprotocol.com/). You will be prompted to connect your wallet. Click on accept and then your wallet will be detected.


# SmartSwap V2

{% content-ref url="/pages/Ij1y0wDSO6CwEYY6Odfy" %}
[Dapp Walkthrough](/smartswap-v2/dapp-walkthrough)
{% endcontent-ref %}

{% content-ref url="/pages/ULoq516mnH3WIwx1RXj7" %}
[Swap](/smartswap-v2/swap)
{% endcontent-ref %}

{% content-ref url="/pages/y7MNNuzdwsB1m2AQkMR9" %}
[Liquidity](/smartswap-v2/liquidity)
{% endcontent-ref %}

{% content-ref url="/pages/Hk2xUgRj5DudvP1QZsyf" %}
[Farming](/smartswap-v2/farming)
{% endcontent-ref %}


# Info

Smartswap is a multinetwork decentralized exchange (DEX) with extra features like auto trading of tokens at certain prices or time. The Rigelprotocol smartswap supports swaps on various pairs.

**Set price :** The set price is an advanced limit order feature which can execute not one, but multiple transactions at a certain price based on preset conditions.

**Auto period :** The auto period is an auto investing & Trading feature. It can help users to execute dollar cost averaging, market making and more. Making trades when not on your devices is now possible with the smartswap. **Scenario** : Investing 2000 BUSD on RGP, over a period of 4 weeks. 500 BUSD worth in RGP would be bought each Week for 4 weeks without users having to execute a transaction each time.


# Dapp Walkthrough

This is the dapp onboarding walkthrough

### Menu <a href="#menu" id="menu"></a>

On the top menu bar, we have different features. These features are:

* **Logo home button -** By clicking this button, you will be taken back to home([www.rigelprotocol.com](http://www.rigelprotocol.com)).
* **Dapps dropdown menu feature -** here is where all Rigel Protocol dapps are found by just a click away. Click on this button and choose any dapp you need to interact with. These are the dapps found on the dropdown menu; **SmartSwap dapp** where you can swap tokens directly, **GiftDapp** where you gift tokens in a fun way, **Smart Bid** where you bid for tokens, **Leverage Exchange dapp** where you trade using decentralized tokens, and **LaunchPad** where you join projects hosted on Rigel Protocol.
* **Swap button with the dropdown menu -** Onclick, this button takes you to the swap page where you can swap tokens directly, view market transaction history on the right side of the page, and view details about RGP token on the left side of the page.
* **Liquidity button -** Onclick, this button takes you to the liquidity page where, you can add liquidity, view your liquidity positions, and also import the pool(s) you joined.
* **Farming button -** Onclick, this button takes you to the farming page where, you can stake,farm, and harvest.
* **Analytics button -** This button on click will take you to the analytics page.
* **Network chain name display -** This shows network names e.g BSC mainnet, BSC Testnet...
* **RGP token balance display -** This diplays amount of RGP available in your wallet.
* **BNB balance display -** This displays the amount of BNB available in your wallet.
* **Wallet address display -** This displays your wallet address in initials.
* **Social Media Menu -** This button contains all Rigel Protocol social media links, including; LinkedIn, Medium, Telgram, Github, Twitter, and Discord.
* **Dark and Light theme button -** This button has made it is to select dark or light theme by just a click away.


# Swap

Swap Page UI and Description

This is where you can swap your tokens directly.

There are two types of interface themes. Those are dark themes and light themes.

![Dark Theme](/files/KzhqfNgiYgKZ0I8Ru6G9)

![Light Theme](/files/1vkNaPHUvn8pxqLHkxAI)

This is done by a click on the dark/light theme button on the top left corner of the page.

### Details Tab

This is located on the left side of the swap page.

It can be minimized by the (-) button or maximized by the (+) button on top o the bar. You can also cancel it by the (x) button which you can make a show again by clicking on the settings icon on swap and selecting the show details tab.

![](/files/WPB8FdqhLjZTy7Z7CqeQ)

This bar contains various details as shown below;

![Details Side Bar](/files/ETowYmYPuSms5G5MOU1m)

These details vary with the tokens you have selected to swap. For instance, the above details are shown because on the swap RGP and AXS tokens have been selected for swap.

The details show the token name, token supply, and token description.

### Transaction History & Market History Bar

This is located on the right side of the swap page.

It can be minimized by the (-) button or maximized by the (+) button on top o the bar. You can also cancel it by the (x) button which you can make a show again by clicking on the settings icon on swap and selecting the show details tab.

There are two histories on this bar, that is,&#x20;

* **Transaction History bar -** This shows a few recent transactions done by you on the smart swap dapp.
* **Market History bar -** This shows recent transactions done by various users including your transactions on the smart swap dapp.

![Transaction History](/files/IOCOU2EWufLGGeiu20Qw)

### Swapping Interface <a href="#swapping-interface" id="swapping-interface"></a>

This is where you select and swap your tokens.

<br>

![Swapping Interface](https://files.gitbook.com/v0/b/gitbook-x-prod.appspot.com/o/spaces%2F-MXLZ01IEAe1iMGUQRpD%2Fuploads%2FIkRZTv6SIqu23FUySSa5%2Fimage.png?alt=media\&token=fb3c76dc-a437-417d-9647-1e6661c5865a)

There are various features for display and user experience, described below;

* **Settings Icon -** This is where you change the slippage tolerance, 0.1%, 0.5%, 1.0% is given or one to choose, and also an insert entry where one can input his own favorable slippage tolerance percentage according to the tokens being swapped and their volatility. Here you also have a time deadline entry for the transaction, this means the transaction will revert when it pends for the time inputted here or more. Also here is where you will find the hide/show the side tabs (details and transaction history tab)

![](/files/FHX2WRtl6wOwHhOFCp7F)

{% hint style="info" %}
Your transaction will revert if the price changes unfavorably by more than the percentage inputted on the slippage tolerance.
{% endhint %}

* **Select a Token Button -** This is where you click and select the tokens you need to swap, you'll be able to view each token with its balance here. You can select tokens on the list or add them if they are not on the list. To add, you need to search the token name or paste the token contract address on the search input space.

![Select a token](/files/LReY4lqr7cqOt9xodaPm)

{% hint style="info" %}
Only tokens in the connected wallet network will be able to be searched and be found
{% endhint %}

* **Input amount space and balance display -** You can view your specific token balance which has made it easy to know the exact amount you might need to swap. The input amount space is to allow a user to input a certain amount of token he/she needs to swap. this is automatically calculated according to the price o the alternate token or swap.\\

![](/files/zbM8EYDQWe3z9TL1snGY)

* **Max Button -** On click, this inputs all tokens selected for swap.
* **Interchange Button -** This button switches the tokens you are swapping and interchange them that for example, RGP token is switched to AXS token and vice versa. Check the illustration below;

![Interchanged tokens](/files/TAs5ZP4UZoggJGRlgkQC)

* **Swap Tokens Button -** This is the main button on this page, it allows you to swap and confirm the tokens you are swapping. You can then view your transaction in the history on the transaction history tab or the BSC scan.

### How To Swap on SmartSwap Dapp

Visit the smart swap page [here](https://smartswap.rigelprotocol.com/#/), then click on the launch dapp button.

![](/files/gYnpkOkscJbHOhiHKO1B)

On the swapping page, select the tokens you like to swap by clicking the select token button and inputting the amount according to the balance in your wallet. You can view your balance on the balance display space.

![](/files/eG4k02QVNeAHPpx0p9Xt)

{% hint style="info" %}
Note that you cannot swap more than the available balance in your wallet.
{% endhint %}

Click on the swap tokens button and then click on the confirm your transaction.

![](/files/i9EMM9Tlzo9TtadS1dgT)

Click confirm on the wallet pop-up and wait for the transaction confirmation.

![](/files/ilo4VJ6W0wunHnrVfSEg)

Once the transaction is successful, this pop-up image above is shown, your tokens balance is now swapped.

![](/files/92eekKSR76UARn4yuJ6J)

For the failed transaction, this pop-up image above is shown, your tokens balance is not swapped.


# How to Swap Video Tutorial

Buy RGP using BNB on SmartSwap Dapp.

{% embed url="<https://www.loom.com/share/d29abc298cdd40ef9282ce05e5c5b83c>" %}

Create and add Oasis network via SmartSwap.

{% embed url="<https://www.loom.com/share/8486b350f7e44bed869ac3716a806363>" %}


# Liquidity

Liquidity Page UI and Description

![](/files/uPX95FjWSWV7SSTD9iz4)

You can visit this page here <https://smartswap.rigelprotocol.com/#/pool>

Any user can switch the theme to dark or light according to his/her preference by clicking on the button on the far top right corner.

There are different features on this page, these includes;

* **Add Liquidity Button -** This button is the main button on this page. Here is where a user clicks and selects the tokens he/she need to add as liquidity. The user will then need to approve and confirm the transaction, after which he/she can then view the liquidity provided on my liquidity positions space.

![](/files/bH9FlRxcJWJBbLRx3nHx)

{% hint style="info" %}
When you add liquidity, you will receive pool tokens representing your position. These tokens automatically earn fees proportional to your share of the pool and can be redeemed at any time.
{% endhint %}

* **Create a pair -** This is a button like add liquidity though this one prompts you to add a pair of tokens as liquidity. This means you will be the first to provide liquidity to the pairs you have created.
* **Import It button -**  If you do not see a pool you joined, you click this button to import. You will have to select the correct pairs of the liquidity you joined then you can manage it henceforth.

![](/files/V3ABQMAy4TO2HkAGUf4Q)

* **My Liquidity Position -** This is a space where you can view all your liquidity positions. Here is also where you can manage your liquidities either by adding more all removing.

![](/files/jUqiL1qRnYJtlKS5Dtv7)

### How To Add Liquidity on SmartSwap DApp

Visit this link to access the liquidity page <https://smartswap.rigelprotocol.com/#/pool>

Click the add liquidity button, the proceed to select your pairs. You have the ability to create your own pair and also import a pool you joined.

![](/files/kT4ngUJ1SgED11V8wxyq)

Select your token pairs and input the amount The dapp auto-sync amount on the second pair, so there is no need to input the amount on both pairs.

![](/files/oNqvEVl2EnGU0VutRBOU)

{% hint style="info" %}
When you add liquidity, you will receive pool tokens representing your position. These tokens automatically earn fees proportional to your share of the pool and can be redeemed at any time.
{% endhint %}

Click confirm liquidity add and confirm your supply.

![](/files/gyAzs2ppRFPL1VfpBIQq)

Click confirm on the wallet pop-up and wait for the transaction confirmation.

![](/files/ICqePX5Y2J7fvIAkbiqb)

Once the transaction is successful, this pop-up image above is shown, your liquidity is now added.

![](/files/YCOMKyWkeVxim1CQXcyd)

For the failed transaction, this pop-up image above is shown, your liquidity balance is not added.


# How to Add and Remove LP Video Tutorial

Migrate V1 Lp to V2 and continue farming

{% embed url="<https://www.loom.com/share/4d5add229a244efd90dfca5288370081>" %}

Add LP using SmartSwap Dapp

{% embed url="<https://www.loom.com/share/5f4d17f0467f433b9878f801a86b1e05>" %}
&#x20;LP using SmartSwap Dapp
{% endembed %}

Remove LP on SmartSwap Dapp

{% embed url="<https://www.loom.com/share/103aa593ec3545f9afea34d2500080d1>" %}


# Farming

Farming Page UI and Description

Visit the farming page here <https://smartswap.rigelprotocol.com/#/farming-v2>​<br>

![](https://files.gitbook.com/v0/b/gitbook-x-prod.appspot.com/o/spaces%2F-MXLZ01IEAe1iMGUQRpD%2Fuploads%2FWFnb4HAAn7GV0g3MCUww%2Fimage.png?alt=media\&token=6e000646-0169-4685-8a55-3fe7554dd70a)

On this page, you can also switch the page theme to dark or light by clicking the dark/light button on the top far right corner. There are many buttons to interact with, on this page. These are;

* **List your project button -** any project can get listed on our farms, by clicking this button and filling out the application form. You can also fill out the form [here](https://docs.google.com/forms/d/e/1FAIpQLSdJGAuABrJd6d0WSprUWB140we9hGqa-IwIbonx9ZJhxN2zsg/viewform).
* **Liquidity pools menu -** You can switch to the v1 and v2 pools by clicking on this dropdown menu.
* **Staking pools menu -** Here you can switch and stake on v1 and v2.
* **Unlock Button -** Onclick, this button opens your farm pool where you can deposit and harvest.

![](https://files.gitbook.com/v0/b/gitbook-x-prod.appspot.com/o/spaces%2F-MXLZ01IEAe1iMGUQRpD%2Fuploads%2FosmY8cSTb3BXWu16dJgE%2Fimage.png?alt=media\&token=65e04ed5-e897-4174-a865-ad4e6c5266fd)

* **Approve and Deposit Button -** These are buttons that will allow you to add LP successfully on the farms. Clicking approves button will allow the farm to deduct 10 RGP tokens as fees. You cannot proceed without clicking this button first if you want to stake tokens. The deposit button is what you need to click next to deposit your tokens to the farm.

![](/files/N57aXrkdI57jfj8IYybb)

* **Harvest Button -** This button enables you to harvest your accumulated RGP tokens from the farms.

![](/files/dZiwmSJqa1QWriQOxswZ)

* **Fee display -** This displays the minimum fee to stake on the farms. The fee is always 10RG&#x50;**.**
* **Auto-Harvest button -** The auto-harvest button enables you to set an auto harvest for the farm.

![](/files/AJBeWLaCIGihvAK7fXCV)

### How To Farm on SmartSwap Dapp

Visit this link to go to the farming page <https://smartswap.rigelprotocol.com/#/farming-v2>

There are five(5) farming pools on V2, namely:

1. RGP-BNB
2. RGP-BUSD
3. BNB-BUSD
4. AXS-RGP
5. AXS-BUSD

Whatever you need here is a respective liquidity pool to stake. If you need to stake RGP-BNB you will need to have RGP-BNB liquidity. After that, click on the unlock button on the farm and view the interface.

![](/files/LHGy95bNkICaRIp3iDSW)

You will see the minimum fee required for farming.

Click on approve button and confirm on your wallet. The buttons will now change to unstake and deposit, click on deposit and input amount of LP, you can also click max to select all LP.

![](/files/DVJ8OIXypiTN1TAOdEWR)

![](/files/APW1AKwN94VipC5uGfBo)

Then click confirm.

Your LP will be staked on the farm.

![](/files/aL6mYRqqyW4KmoeVOkLW)

Now relax and earn easily even while you are away or asleep.

#### How To Harvest.

Go to the farm page and click unlock button.

![](/files/KJfdfD6N4qLhOUOUnaCE)

You will see the earned RGP, click on the harvest button and confirm on your wallet.

Wait for the confirmation and once the transaction is successful, the RGP harvested will be deposited in your wallet.

You are done.


# Farming Video Tutorial

Stake on SmartSwap farm

{% embed url="<https://www.loom.com/share/372aa04967b241fc8756f5f8db7f4a68>" %}

How to harvest RGP on SmartSwap Dapp

{% embed url="<https://www.loom.com/share/f6bffef6fbc94c598a8cb7c63ca6975d>" %}


# Set-Price

Set Price feature description

Set Price: There are a lot of mixed emotions during the bear period in the cryptocurrency market. With the set time feature on the Rigel protocol, you can be rest assured that your loss will be minimized.

![](https://lh6.googleusercontent.com/EY8UY-N9fQ0olEcGoeIZpbUOARZOTMrfpMqf2tHCUtu0_whnRvbdqZAQtwgqMNovL329i3yXEFj-_v_5ZMjZs8ycH-tSxb8Bb8BU5OEaj3Dcfh1q-dSSDEoTfYlDWe8JCOQuOb4I5uq6g-VfHQ)

Step 3: Select the tokens you wish to swap by clicking on the “select a token” dialogue box.

![](https://lh4.googleusercontent.com/kXZZ2LCEwgP1x3aaP2791Xk07hTNS0WydzwbKlvx48mzOKXkxPt9makyLEefY3tfHAvZ6lCijdl-CPkB0LRzRR7w7d4VPhvYxWI_KNA5iX3NGt_h9d6ncCqLvjgVJGZ1rmKiKiTlPsu4CBgrWQ)

There are lot of tokens you can choose to swap. For this documentation we chose BUSD and RGP.

Ensure you input the amount you want to set-price for and the frequency you want the token should be deposited.

You have to sign the wallet to proceed to the next stage.

Step 4: Request for signature by signing in to your MetaMask wallet.

![](https://lh6.googleusercontent.com/Yc10515xjFqcZWc3XAsjDO4vRYN1B76FP22qknaN6giVk3k79f2XmJq_rQUrpQ8y5Bqbotzm8per0YdT_e9lxxq9tx2wFcWdrkGKrKnJqXhylcDcm55JLOeRmDKgOdFaAhgrR1u366U948IZ-w)

Step 5: Approve the token you have chosen. In this Documentation we chose RG&#x50;**.**

![](https://lh6.googleusercontent.com/0eKPLFIANgSEEuKH-io6JCPgnpm-Oi31gieBKUm97OOfumTiOUL9EMFQE1e69bWZpy6lDFs9GuVJPy5qxqyr3nct98ApGr3m_TeQsBecYbUQvGuAH9-UjrfehdZQBJjCpoHssFqFuLULFQB-ig)

![](https://lh4.googleusercontent.com/8rqpmmJkV1oq2yWkcJAljHUdMooOcDs5SvD-v1sBT1frPfooAMAagbYqYXD4tpw490X8LlrojxxVkKxXf3d75E4J7mpFC3v2yWX21kG6bKzI49uKTf6VUWXPB3pEdbfINGCOy-rAej3I3vC_BQ)

![](https://lh4.googleusercontent.com/l4YnqILSZz5e0it0gELg_3jLV6F6gkRiFOpPbb_Gk6Jed1Ou3jJzhSAcG586AZV0vdtE1sqxsU63bsy2s2oSPAV9KzWs4O1tr1vJCAgdoTrKBM_i3E3E6MsvVuilzcCiG8_K2Y-Owz--pR1XhA)

Step 7: Check your order history.

![](https://lh5.googleusercontent.com/bDeQvLnkIM-GVa-TkUFADjACvXptse-LhB9F41ruGEAk8g0fOauB3JOdSxjt5XHdBGPLAC9tZ3i5hMitlQYWAPKD3bK58PIdXn0U6Gua2_IY4YWb0Jla0G5Poc8ZbZU9G9DlABhrS3oNiip3Cg)

Step **8**: Watch, wait for your condition to be met, and watch your trades execute automatically in real-time.


# Auto-Trade

Auto-Trade feature description

Our Auto-Trade feature enables you to invest in any crypto of your choice. Our Dapp helps you to buy specific crypto with a predefined amount at your preferred period (Daily, Weekly, and Monthly).

You can Efficiently execute market making with our Auto-Trade feature on any DeFi Token pair.

Step 1: Click on <https://smartswap.rigelprotocol.com/#/autotrade> to get started with this feature.

Step 2: Click on the AutoTrade feature.

<figure><img src="/files/4EuONr2gIFkOvU8njO5b" alt=""><figcaption></figcaption></figure>

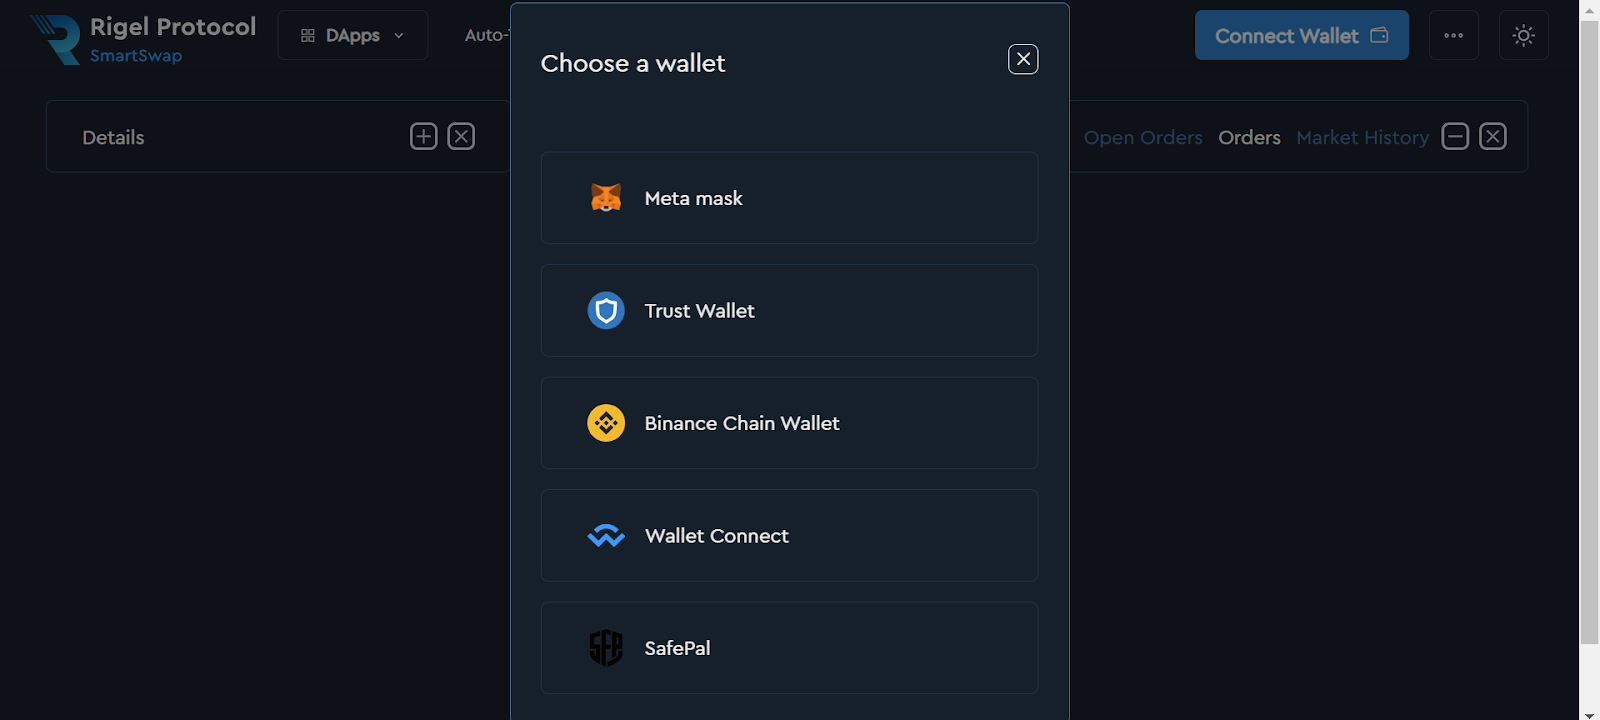
Step 3: Select a wallet to perform your transaction.

<figure><img src="https://lh6.googleusercontent.com/e21NgyMJNhUbOXQE78AL8A35yuyQxPV_aAWC5joWi0zo4QZIvVTXDfnkRhksfnl7SKYl5GvRG83IyGMYDUXFCQknmIb9hbFC29w2W6ErVi2MV4aSvYoXZR0WrUUEEpGJO2TWCaDJJ7TevbSCcA" alt=""><figcaption></figcaption></figure>

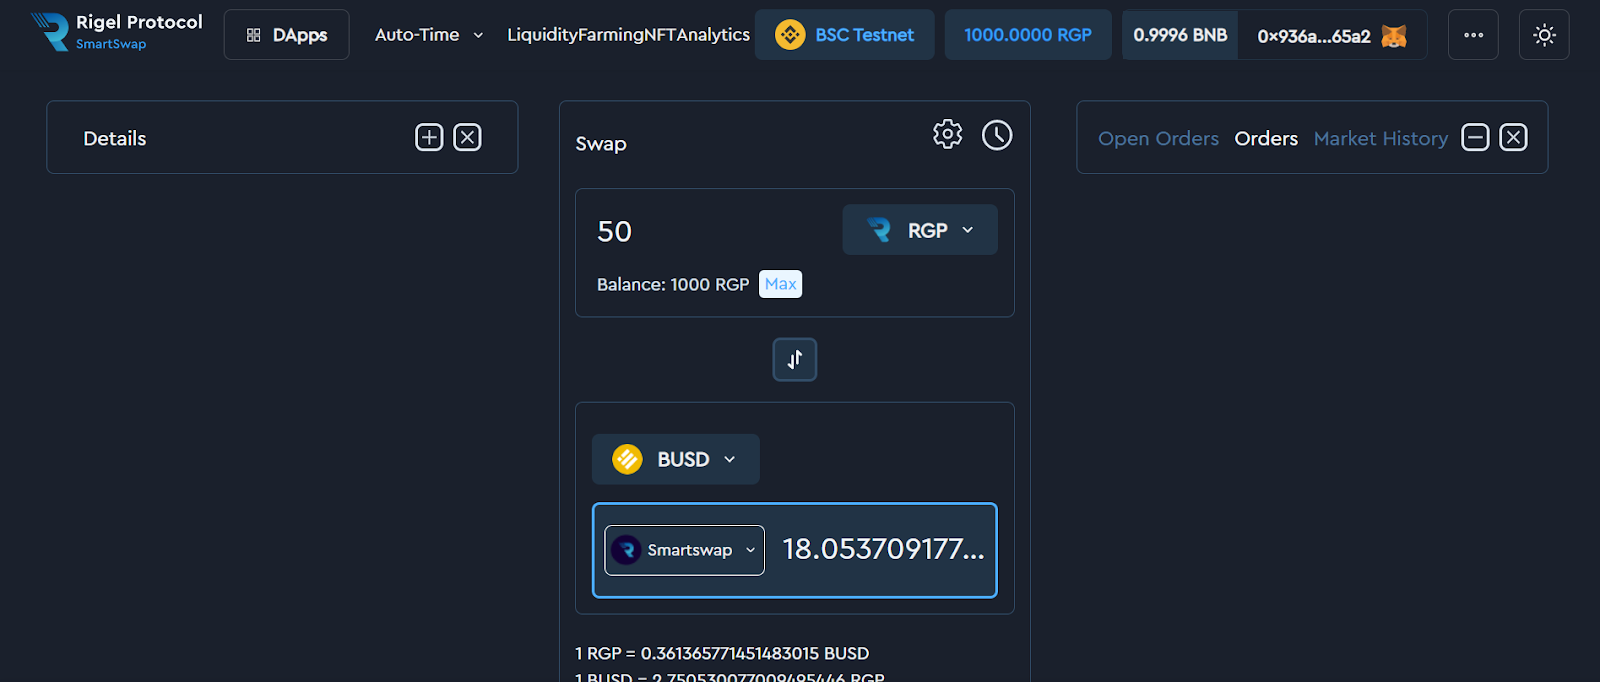
Step 4: Select the token you want to set AutoTrade for and the token you want to swap. After selecting the token, choose the amount you want to set auto-trade for.

<figure><img src="https://lh4.googleusercontent.com/Vm5A2EueKFEQvTYss9Xnyfy3CmAQ61pTWgYagOsu9_0Utjw-umYFS7eTC5OvKUVMi-7DPJpa6261em2_PgI5YSec6bJJA-d9xyVcNtm3rf2tDliQt55YVnBBAMQCMRgUuWmlmH9PsqwiV9FUyA" alt=""><figcaption></figcaption></figure>

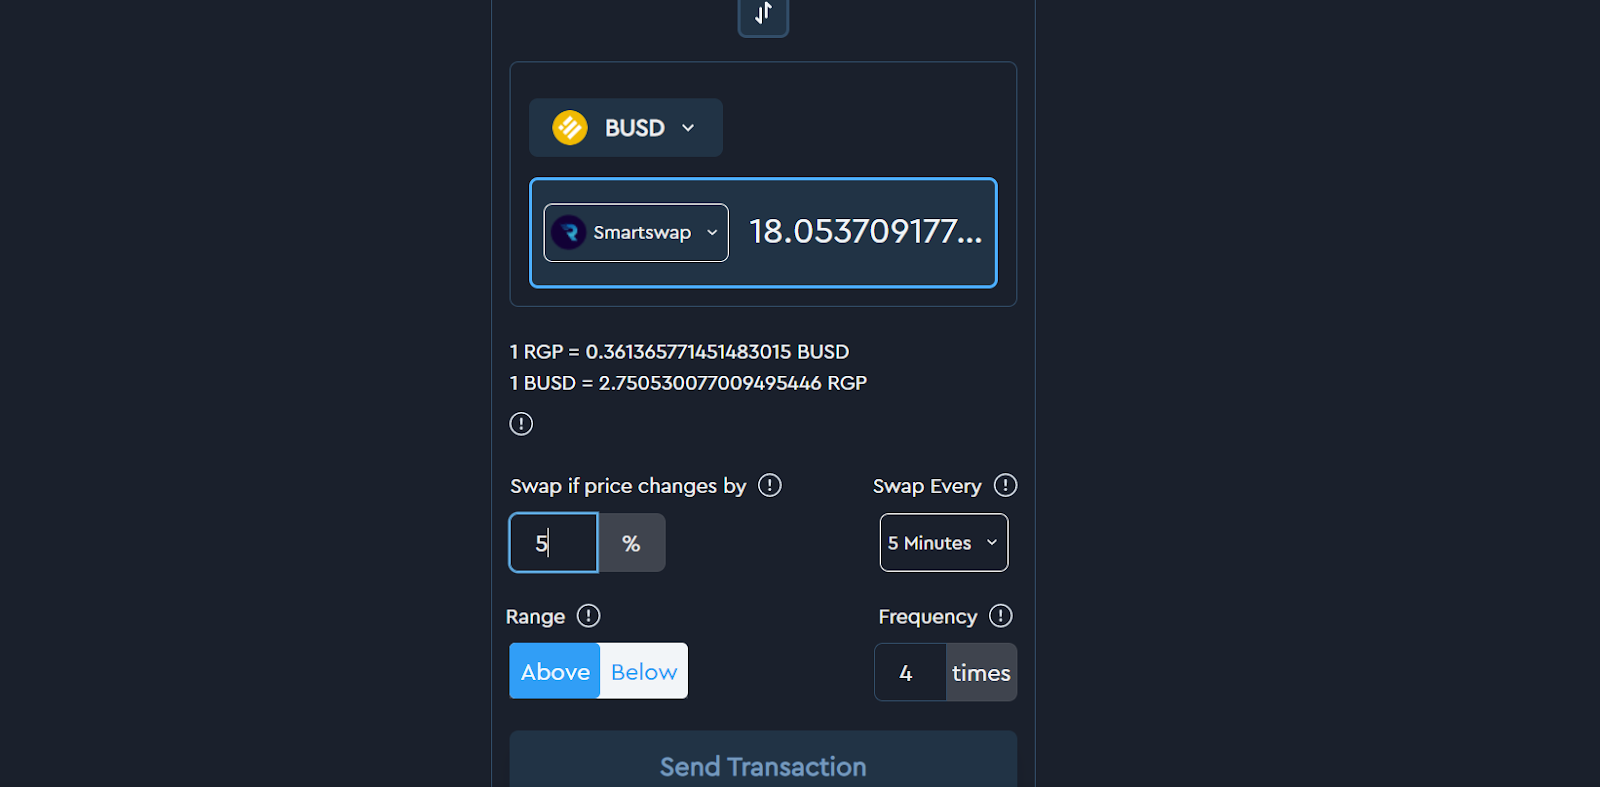
Step 5: Set the auto-time. The price can be set below or above. You can also choose your desired duration(Min, hours, or day).

<figure><img src="https://lh3.googleusercontent.com/PFQVQKHp8405t98pJVE0y70SI4uPekgIokXHtWdCYm3KrIddSSZyYdeywQe6n9VgdueL5zw3yUYLIuiYSIfzxhP2Rg7UZ_DkUKbBgXuX83n5cbq_Qml8bX8wOgaIlHsw_N3cD0if3NVIS_h_wA" alt=""><figcaption></figcaption></figure>

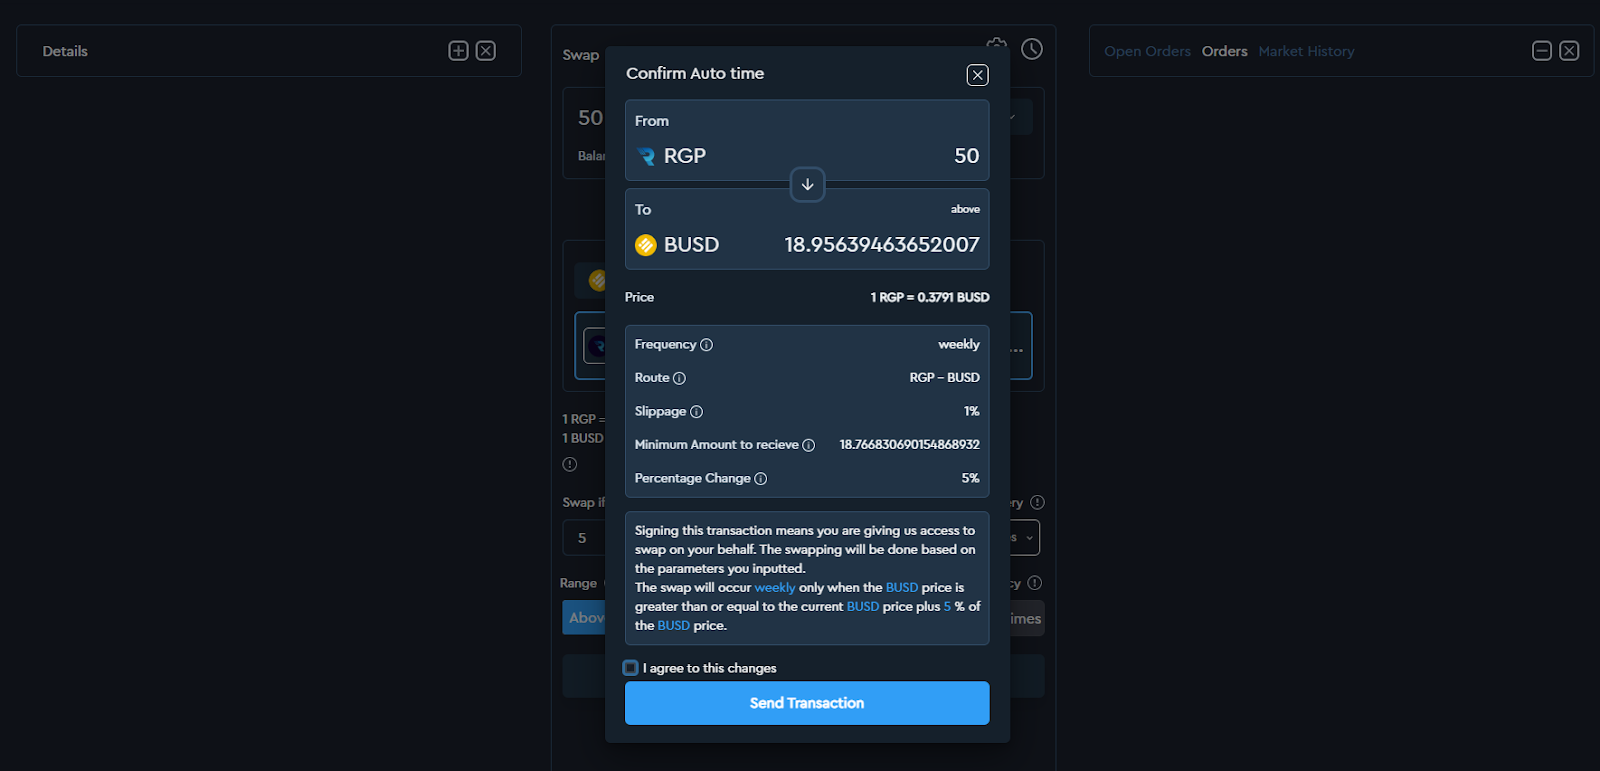
Step 6: Send Transaction

You only have to do it once.

<figure><img src="https://lh6.googleusercontent.com/EszWGcrjx6DD-Z3YVrcXZn4g17UeWQLYr4nnkAIazY29Yg1-OBhiOwz1Hm61KsuaWiB8sAh3-g_42jPFleoIOqqeqDuTJ4c9rSU1XKjm711OXASirl38IZphds73P2C2dax2b3ap5LFvqTEe7g" alt=""><figcaption></figcaption></figure>

Step 7: Process successful

<figure><img src="https://lh6.googleusercontent.com/GtpljH7F_tStEyQ-DAxCmNb8rwdnYGUdMUWwSNuEF0dNMPC9GbhuMj_5r2S12nrkWl2jCN9OkTlwrR9-V-ekqlzooYzJRYjU4q9G4nFDg_tOtFE2rUslioLHfoopctsMLKh4nBEd0CX-zO6xsg" alt=""><figcaption></figcaption></figure>

<figure><img src="https://lh4.googleusercontent.com/r-lD4ePqIWnHro60Zi15LazktqAx0OJ88Y4154NqC2MZ7mfdInXFtAPOi1z988drpG9AV-neckHlTdLlRT5oCxoOKDZgk-uew7zkds9gKIflqy-ZfTEc8mCcfL2AheH0_L3YvSGGIUN6VrmCGg" alt=""><figcaption></figcaption></figure>


# Smartswap Rigel NFT

NFTs

A lot of features and use cases for our NFTs;

***---| Backed by proof of work***

&#x20;***---| Use NFTs to work at Rigel jobs***&#x20;

***---| Earn rewards on NFTs***

&#x20;***---| NFTs will be featured in our games***

&#x20;***---| Automated liquidity for NFTs***&#x20;

***---| Arts getting features in our Metaverse world***&#x20;

***---| Rent NFTs***&#x20;

***---| Farming pools available for NFTs |***

### **Where to buy Rigel Protocol NFTs**

Find video link on this topic here: <https://drive.google.com/file/d/15NQM8ASH8JxMVOTbAlMbsawb-QsYwNo8/view?usp=sharing>

### **How to buy Rigel Protocol NFTs**

1. Click on <https://smartswap.rigelprotocol.com/#/>, when the page opens, click on the "**LaunchDApp**" button.
2. Navigate to NFT on the navigation bar.

![](/files/7ZwKphmqZjeG8ZAp0a9F)

2\. Scroll down to view all NFTs available.

![](/files/tVrspNmOL6Mxplvuxuco)

3\. Select your best NFT to purchase, for example,  the NFT below.

![1176](/files/nbrH3fmQkCCdnfsxIUAG)

4\. View the NFT by clicking the view NFT button.

![](/files/kAW1YhapB4OvpncunWO9)

5\. Click the buy NFT and select the crypto to buy with. You will be given 2 options of BUSD and USDT only. Swap other cryptos to these cryptocurrencies on our SmartSwap dApp here <mark style="color:blue;">smartswap.rigelprotocol.com</mark>

![](/files/aInYshXzAIMAgHEiIKT8)

6\. Approve the transaction and confirm on the Metamask pop-up. Now click the BUY button and confirm on the Metamask pop-up as shown below.

![](/files/A5O8k3Ryb5zgPK9egUOw)

7\. For a successful transaction, the below window will be shown;

![](/files/qmdAIImqqepblYIojp7r)

8\. For an unsuccessful transaction, the below window will be shown.

![](/files/iTFRyu5OSncTBE0czpqp)

**What can bring about an unsuccessful Transactions:**

* Not enough amount for purchase.
* Not enough BNB for fees.
* Low/no network connection.
* Multiple transactions at once. This might be brought up by clicking the BUY button more than once.
* DApp bugs( this is rare/ less often).

For persisting bugs encountered, you can forward queries and inquiries to our support on our communication channels on Telegram, Discord, Twitter and our official support Email address, this is so the bugs can be filed and resolved accordingly.


# Launchpad Rigel NFT

NFTs

A lot of features and use cases for our NFTs;

***---| Backed by proof of work***

&#x20;***---| Use NFTs to work at Rigel jobs***&#x20;

***---| Earn rewards on NFTs***

&#x20;***---| NFTs will be featured in our games***

&#x20;***---| Automated liquidity for NFTs***&#x20;

***---| Arts getting features in our Metaverse world***&#x20;

***---| Rent NFTs***&#x20;

***---| Farming pools available for NFTs |***

### **How to buy Rigel Protocol NFTs**

Find video link on this topic here: <https://drive.google.com/file/d/15NQM8ASH8JxMVOTbAlMbsawb-QsYwNo8/view?usp=sharing>

### **How to buy Rigel Protocol NFTs**

1. Click on <https://launchpad.rigelprotocol.com/app/v1/nfts> , when the page opens. Ensure your wallet is connected to the Dapp to view available NFTs.                                                          &#x20;

*Supported chains : Binance Smart Chain and Polygon Network.* &#x20;

***For Quick Mint :**&#x20;*&#x20;[*https://launchpad.rigelprotocol.com/app/v1/nft/mint*](https://launchpad.rigelprotocol.com/app/v1/nft/mint)

2\. Scroll down to view all NFTs available.

![](/files/nWTLL5vRaBy1RJUctbg2)

3\. Select your best NFT to purchase, for example,  the NFT below.

![](/files/tHAwcYsteuUyanSKw8Me)

4\. View the NFT by clicking the view NFT button.

![](/files/tLIzf9DTwhHZ780JqD8t)

5\. Click the Mint NFT and select the crypto to buy with. You will be given 2 options of *BUSD and USDT*  on BSC or *USDC and USDT* on polygon Network .

![](/files/1gocGC5KxFzbKJq62TFk)

6\. Approve the transaction and confirm on the Metamask pop-up. Now click the BUY button and confirm on the Metamask pop-up as shown below.

![](/files/A5O8k3Ryb5zgPK9egUOw)

7\. For a successful transaction, the below window will be shown;

![](/files/qmdAIImqqepblYIojp7r)

8\. For an unsuccessful transaction, the below window will be shown.

![](/files/iTFRyu5OSncTBE0czpqp)

**What can bring about an unsuccessful Transactions:**

* Not enough amount for purchase.
* Not enough BNB/Matic for fees.
* Low/No network connection.
* Multiple transactions at once. This might be brought up by clicking the Mint button more than once.
* DApp bugs( this is rare/ less often).

For persisting bugs encountered, you can forward queries and inquiries to our support on our communication channels on Telegram, Discord, Twitter and our official support Email address, this is so the bugs can be filed and resolved accordingly.


# SmartBid DApp

SmartBid Documentation

The Smartbid is one of the best DApps in the Blockchain industry. This document contains how to place a bid on the Rigel protocol Smart bid.

***How winners are picked for the Smartbid ?***

The Smartbid Dapp feature isn't based on luck, but on the highest and most determined bidders. So become a winner on any bidding events. *All you have to do it out bid other bidders.*&#x20;

***Three Highest bidders based on amounts are winners. Again, a selected numbers of random winners(5-**&#x32;**0 participants) are again selected.***&#x20;

***Tutorial Video :***  [***https://youtu.be/eBx2xaa2XZc***](https://youtu.be/eBx2xaa2XZc)

Step 1: Go to the Dapps [Link.](https://smartswap.rigelprotocol.com/#/smartbid)

![](https://lh6.googleusercontent.com/5fLbVy7xiNTgzDkC18TkFkS-hyOw1vfgi58LImSZB1Hmon6XX8XP8ZpPLPkKfLQa05pG_EmNNPefq9HyVOMt__lJAMDzh9x19JDxyknRK1aYwcGinkLAbxZG71t7xiFnV9zR53ys9NcRtlgE0bE)

Step 2: Click “Dapps”, and click on [SmartBid](https://smartswap.rigelprotocol.com/#/smartbid).

![](https://lh5.googleusercontent.com/6IltvY0Bim_P7J_LyvJ1CE_ACCPmu6fbIh7BbyBIHt7BNTn6oGocCqpE4KLwheL26WGiSI5jgg4CReD7L8nn6yvq5hzHHZ-9bxv2I-urass7lb3_LAE7mO5_j9a0r8Yk2zb4VCkPILU31V4DZDY)

Step 3: Connect your [Metamask wallet ](https://metamask.io/)to the Dapp.

![](https://lh6.googleusercontent.com/QSX80v9zAwZ3Et7MY03YUZP49UE-9hYfR0bRNQwTY_x938I1CfETGWj8ETzrMkLPJzss3w0a_PveDdoRLQQha7j6hsXWtdwiPpCzxyhqsNoxXpdbZ0ICtryOSzqoUQqglF5XwKEJRtSOMiuVgAg)

Step 4: Click and view one of the events that are presently live.

![](https://lh4.googleusercontent.com/dOIprdE5nDuaVlqeoBNixhL4kGF9XoaCU0Z_MBu8TmBJX3Gx8ub2Tg-Fm0crP0XTUQz_GaGfzrEYsqiv9TKLyjU1NnQmWy9Tslh-Up0RGgB6a7JUO3K-FmdC_zURKy2Iz8NjpifWcABwlFPcHxA)

Step 5: Read the instructions.

![](https://lh6.googleusercontent.com/8ogdY7-Pm1LqA7FDYDR2ROwg01oxSKVGW38cFhh82Y8hZJ05hOHuX_dA1yJugwKF5aolPy9igKztb618z35kDWsHPRuYqE5zrhuLtNEAX10He8hdnM45BtuRza-1SQalOCFGMjiOgyA_lS_s_OI)

Step 6: Confirm and approve eligibility to place bid.

![](https://lh5.googleusercontent.com/eWLy91oNHYEwVOhbMVo_heSO9rPm5GM5BsblFvoMmRSk-H9AOHk5MehSLF60J0dYiiE6mu__FCL9YhqY6VbxumPQWAO-fBqyz5CdQ9Gw8jE_XU-7o39R70kpco1w8WxR_uCgJwErG-Bo0fBpHwo)

Step 7: Place a Bid.

![](/files/eZbSkSWhPXPegcgHIRCT)

Step 8: Transaction Successful

![](https://lh5.googleusercontent.com/-krHJakxDsjAd4ZDoKfsYuQilRsPi7a4xOrHpx8_tYo9_vyTSbkXbMI_yMI09HdxN_Z-OxgCJXbOGeHb3aYQAA337Pe2ohPIUkKI3UnB3yC_1xk8wrC5ZgRbIvCiix4kmIS7vaMhjCRAbihzPM4)

Step 9: Claim your Reward

![](https://lh4.googleusercontent.com/4V0c0WKj3nj7ndJD4oHUqZSZIlfeeHjOAxHzCYjuOAZHJ2jJ7SftqbDF3obeJiBV1GFNa4DgdqEnYDvOy1NNhRcFTrjhyxaK5zz4HF_5xhTyHO5tdH3DO56aVJoR_VTKvly-C9kcaH9NXc8EZ0c)

{% embed url="<https://youtu.be/eBx2xaa2XZc>" %}
How to place a bid in Events and Claim Rewards
{% endembed %}


# MINEPAD

***The key to decentralization is constant innovation which enhances user experience.***

***What is Minepad ?***

***Minepad** is a new innovation to fundraising. Minepad gives investors the chance to get back their initial investment. Minepad also rewards investors with token allocation based on the project invested in via the minepad.*&#x20;

***Why Minepad?***&#x20;

***A new way to fundraising.***

***Reward Early Investors.***&#x20;

&#x20;*Investors lose money investing in new projects especially in the **bearish season**, as we see tokens listed on the first trading day drops by **over 200% of the IDO or token sale price.** Creating a way to reward first set investors progressively joining a token sales is highly important.*&#x20;


# How it works?

**How it works**

* Investors will earn 5% Fixed Daily Profits on their Investments
* Mining for 7 days and Cash 50% of the Profits on the 7th Day.
* Investors receives tokens from project based on invested amount allocation.&#x20;
* A fee percentage of investments is used to supply Funds to Fundraising project.&#x20;


# Steps to use the MinePad

Step 1: Click on the link: launchpad.rigelprotocol.com and click on the "MinePad" button on the Navigation bar to access the MinePad Homepage.

<figure><img src="/files/LDfkhdGb90P4As72rpa6" alt=""><figcaption><p>Fig 1.0 MinePad Homepage</p></figcaption></figure>

Step 2: Click on the "SEE MORE INFORMATION" button to see more details on the ongoing token investment on the MinePad.

<figure><img src="/files/BKEaUWNhaiHAoBZPZ8px" alt=""><figcaption><p>Fig. 2.0 See More Details</p></figcaption></figure>

Step 3: Click on "INVESTMENT" to make your first investment on the MinePad. Click on "APPROVE" to approve transaction, confirm transaction on your Wallet, when transaction is confirmed on the Blockchain, go ahead to click on "DEPOSIT" to make investment, type in the cell the amount of token you want to invest and confirm transaction on your Wallet.

<figure><img src="/files/WVW4tfV4YrOyree2wDAx" alt=""><figcaption><p>Fig. 3.0 Input token amount to deposit</p></figcaption></figure>

<figure><img src="/files/W5jYlpUoy3EBI1YS4W4b" alt=""><figcaption><p>Fig. 3.1 Deposit transaction loading</p></figcaption></figure>

Step 4: View "Total Staked" under the "INVESTMENT" tab to view total amount successfully staked.

<figure><img src="/files/wHK5bT6z85IcPJmg6h0n" alt=""><figcaption><p>Fig. 4.0 Total Amount Staked</p></figcaption></figure>

Step 5: Have an overview of your investment details so you can be data informed on the trajectory of your investment - view transaction details under the "STATISTICS" tab.

<figure><img src="/files/MBy2UpMw8wobNdjjiIbF" alt=""><figcaption><p>Fig. 5.0 Statistics</p></figcaption></figure>

Step 6: Use the "MINE NOW" button to mine your Daily ROI Amount, and use the "WITHDRAW PROFIT" to withdraw 20% allowable Profits.

<figure><img src="/files/bzaCn8O6r5WhAH5NtDDC" alt=""><figcaption><p>Fig. 6.0 Mine and Withdraw</p></figcaption></figure>

<figure><img src="/files/X44c5Bcwdqmay4mdsLFL" alt=""><figcaption><p>Fig. 6.1 Mining Tokens</p></figcaption></figure>

<figure><img src="/files/JgSj68XBMVsSEzp6drsT" alt=""><figcaption><p>Fig. 6.2 Withdraw Profits</p></figcaption></figure>

Step 7: Click on the "TOKEN VESTING" tab to view the details of your token vested for a period, and click on "CLAIM REWARD" to claim vested tokens.

<figure><img src="/files/Q50C9R9EjuJOE77ngkoi" alt=""><figcaption><p>Fig 7.0 Token Vesting</p></figcaption></figure>

<figure><img src="/files/g3E7d9ePCiEuFLxCVb83" alt=""><figcaption><p>Fig. 7.1 Withdraw Allocation</p></figcaption></figure>

Step 8: Click on the "REFERRAL MENU" and click on "Referral link" to access the Referral link, you can copy and share the referral link to receive 7% of tokens from your referrals that invest in projects. Also, to claim amount earned on Referrals, click on the "CASHOUT REFERRAL REWARD" button and cash out referral rewards.

***Note : You have to invest for you to earn referral bonuses...***

<figure><img src="/files/5TPzCwf2qP47o6G8BZo3" alt=""><figcaption><p>Fig. 8.0 Referral Menu</p></figcaption></figure>

<figure><img src="/files/h1q5GMvckovdZ1ZXrU4P" alt=""><figcaption><p>Fig. 8.1 Referral link</p></figcaption></figure>


# User Action Videos

1. How to engage "INVESTMENT"

{% embed url="<https://www.loom.com/share/8025956a3a7d49478f5e3d93dfabaeac>" %}
Investment
{% endembed %}

2\. How to engage "TOKEN VESTING"

{% embed url="<https://www.loom.com/share/6aa1ebfa25f7460faf0cd18f48cab25f>" %}
Token Vesting
{% endembed %}

3\. How to engage "REFERRAL"

{% embed url="<https://www.loom.com/share/f79d82e97e06463bb0cdd89e3ea85205>" %}
Referral
{% endembed %}

4\. How to engage "MINING"

{% embed url="<https://www.loom.com/share/b9947308a9264ba49254c9d1bf2097c2>" %}
Mining
{% endembed %}

5\. How to engage "WITHDRAWING PROFIT"

{% embed url="<https://www.loom.com/share/5bf59fbce935495f8b92957870247d25>" %}
Withdrawing Profits
{% endembed %}


# Terms and Conditions

* Rigelprotocol Labs (Rigelprotocol) does not force any investment done through the minepad but by user own research and discretion.&#x20;
* Cryptocurrency are highly volatile proceed with caution.&#x20;
* Minepad investments are  volatile  proceed with caution and your own free will.&#x20;
* Rigelprotocol Labs (Rigelprotocol platform or Rigelprotocol ' s Team) platform will not be held liable for any losses or damages incurred through the minepad(launchpad).&#x20;
* Rigelprotocol Labs (Rigelprotocol platform or Rigelprotocol ' s Team) platform is only providing a means or access to high quality projects and not providing any financial advice in anyway possible. Do your own Research.&#x20;
* If you accept these terms, you are proceeding with your own full understanding and will. Knowing fully well, the consequences of your actions


# Assessment

***Investment Slide:***&#x20;

* Access investments in BUSD.&#x20;

<figure><img src="/files/eCgx8xaqGXe5pnRqs9vu" alt=""><figcaption></figcaption></figure>

**Data Overview :**&#x20;

*Have a clear look on all your info*

<figure><img src="/files/7MRDA7XUCQ0pzBcyxnBn" alt=""><figcaption></figcaption></figure>

**Token Overview:**&#x20;

Menu displaying tokens&#x20;

<figure><img src="/files/VfC6WblgKQGQe8On87ME" alt=""><figcaption></figcaption></figure>

**Referral :**&#x20;

* Earn 7% in BUSD on each referral

<figure><img src="/files/LCkLYnBsiXT2gG17SXQe" alt=""><figcaption></figcaption></figure>


# P2P DApp: Web Version

A. The Rigel Protocol P2P DApp is a decentralized peer to peer non-custodial trading platform where Merchants can buy and sell Cryptocurrency.

<figure><img src="/files/Oo7Qk0ljTEtnWgJ9TziO" alt=""><figcaption><p>Fig. 1.0 P2P DApp</p></figcaption></figure>

B. What does the P2P DApp help users achieve?

* Direct exchange of crypto to fiat(150+ currencies).
* Direct exchange of fiat(150+ currencies) to crypto.
* Ease of crypto accessibility.
* Come into crypto with any fiat currency.

C. How does it work?&#x20;

* Trader Bob wants to buy [$RGP](https://twitter.com/search?q=%24RGP\&src=cashtag_click), Bob has just USD. Using the P2P DApp, Bob can easily buy [$RGP](https://twitter.com/search?q=%24RGP\&src=cashtag_click) or any token with USD.&#x20;
* Trader Ben wants to sell [$ROUTE](https://twitter.com/search?q=%24ROUTE\&src=cashtag_click) for fiat, Ben can easily convert [$ROUTE](https://twitter.com/search?q=%24ROUTE\&src=cashtag_click) to fiat in seconds.

<figure><img src="/files/UNE7YJq9hz1WxF4C1qNo" alt=""><figcaption><p>Fig. 1.1 How does it work?</p></figcaption></figure>

D. Benefits of being a Merchant on the P2P DApp

* Access to buyers.
* Non-custodial.
* Time based trades.
* Trade edits - Set price flexibility.
* Profits frim high trade volumes.
* Decentralized dispute resolutions.
* Enjoy the full WEB3 experience.

  <figure><img src="/files/uynAEKxS4h6IXuS9jgj8" alt=""><figcaption><p>Fig. 1.2 Benefits of a Merchant</p></figcaption></figure>

E. User and Merchant Video:

{% embed url="<https://youtu.be/ONGm1fQP3b0>" %}
Fig. 1.3 User and Merchant Video
{% endembed %}


# Connect Wallet

P2P

Open DApp and connect wallet on BSC and Polygon

<figure><img src="/files/I7jzGxDGCfe0h2d9bzAw" alt=""><figcaption><p>Fig. 1 Connect Wallet Screen</p></figcaption></figure>

Step 2: Wallet Connected

<figure><img src="/files/NYy1m2MJLCX795VdXe4B" alt=""><figcaption><p>Fig. 1,1 Wallet Connected</p></figcaption></figure>


# Create an account

Step 1: Click on "Account" and click on "Profile" to create new account.

<figure><img src="/files/hsnOVoXsWeW0tBF4vSWt" alt=""><figcaption><p>Fig. 1.0 Account</p></figcaption></figure>

Step 2: Add "Name" and "Phone Number"

<figure><img src="/files/AUPFJeGjdWVoi4ikbrTR" alt=""><figcaption><p>Fig. 1.1 Create Account</p></figcaption></figure>

Step 3: Add Payment Method

<figure><img src="/files/eYLFsWvNHdvDZn6NvaHg" alt=""><figcaption><p>Fig. 1.2 Payment Method</p></figcaption></figure>

Step 4: Add Payment Details

<figure><img src="/files/QR8nJ6OpjPwcgPOZPqAS" alt=""><figcaption><p>Fig. 1.3 Payment Details</p></figcaption></figure>

Step 5: Trade

Note: This is on the premise that your account was created successfully.

<figure><img src="/files/vrDNNwyIJhxm6cXcUw35" alt=""><figcaption><p>Fig. 1.4 Account Created Successfully</p></figcaption></figure>

<figure><img src="/files/HdJi5U7teY5ktZ53Uxso" alt=""><figcaption><p>Fig. 1.5 Trading Page</p></figcaption></figure>


# Create a Buy Ad

P2P

A. How to buy by creating a Buy Order

&#x20;Step 1: Create a Buy Ad - Click on "Create a buy order" to create a Buy Ad.

<figure><img src="/files/xAOlru7M0GndIZonEuxv" alt=""><figcaption><p>Fig. 1.0 Buy Order</p></figcaption></figure>

Step 2: Trade Type and Price - Fill in details for type of trade, Crypto you want to buy, the Fiat currency you want to buy the Crypto in, and set to Fixed Price or Floating Price.

<figure><img src="/files/CQd9mCtpC47uPbCuNNrq" alt=""><figcaption><p>Fig. 1.1 Trade Type and Price</p></figcaption></figure>

Step 3: Approved Quantity - Add specifications for Approved Quantity and Trade Limit and click on "Next".

<figure><img src="/files/poa6U5GVnEs78ZlFL9uH" alt=""><figcaption><p>Fig. 1.2 Approved Quantity</p></figcaption></figure>

Step 4: Payment Method - Add bank account details and specify payment time limit, and click on "Next".

<figure><img src="/files/agmJiPYMLoxmUwU0tk1k" alt=""><figcaption><p>Fig. 1.4 Payment Method</p></figcaption></figure>

Step 5: Automated Response - Add specific details that will be displayed to users as "Automated Response" and "Trade conditions" when they engage your ad.

<figure><img src="/files/KrB2ADpzytqKvt9AQ6Ko" alt=""><figcaption><p>Fig. 1.5 Automated Response</p></figcaption></figure>

Step 6: Confirm Ad details - View overall Ad details and confirm before clicking on "Confirmed, Post Ad" to post Ad.

<figure><img src="/files/qTjrL0aLZ3sDTU1MdFwK" alt=""><figcaption><p>Fig. 1.6 Confirm Ad details</p></figcaption></figure>

Step 7: Ad Created Successfully

<figure><img src="/files/5nQpAzwBIRd65r0VO2Hp" alt=""><figcaption><p>Fig. 1.6 Buy Ad</p></figcaption></figure>

{% embed url="<https://www.loom.com/share/780279ec2a434ac4a10ba066c1ac6071>" %}
How to buy on the P2P DApp
{% endembed %}


# Create a Sell Ad

P2P

A. How to Sell by Creating a Sell Order

Step 1: Create a Sell Ad - Click on "Create a sell order" to create a Sell Ad.

<figure><img src="/files/T1wWJ5bNH4bdogaelNcK" alt=""><figcaption><p>Fig. 1.0 Sell Order</p></figcaption></figure>

Step 2: Trade Type and Price - Fill in details for type of trade, Crypto you want to sell, the Fiat currency you want to sell the Crypto in, and set to Fixed Price or Floating Price.

<figure><img src="/files/446yXwP5HPfxmOrzk6bd" alt=""><figcaption><p>Fig. 1.1 Trade Type and Price</p></figcaption></figure>

Step 3: Approved Quantity - Add specifications for Approved Quantity and Trade Limit and click on "Approve RGP"

<figure><img src="/files/jpQVuFGP71qUlkO9v3iS" alt=""><figcaption><p>Fig. 1.2 Approved Quantity</p></figcaption></figure>

Step 4: Approve RGP on Wallet

<figure><img src="/files/mu0zWoIvYuKO7TmZo6OO" alt=""><figcaption><p>Fig. 1,3 Approve on Metamask</p></figcaption></figure>

Step 5: Payment Method - Add bank account details and specify payment time limit, and click on "Next".

<figure><img src="/files/X2HgqNvEwBBzfpHjb0kP" alt=""><figcaption><p>Fig. 1,4 Payment Method</p></figcaption></figure>

Step 6: Automated Response - Add specific details that will be displayed to users as "Automated Response" and "Trade conditions" when they engage your ad.

<figure><img src="/files/ZS60bReYaG5h6Q3wLemK" alt=""><figcaption><p>Fig. 1.5 Automated Response</p></figcaption></figure>

Step 7: Confirm Ad details - View overall Ad details and confirm before clicking on "Confirmed, Post Ad" to post Ad.

<figure><img src="/files/KHY9PKcXwHMbGhSGWTuj" alt=""><figcaption><p>Fig. 1.6 Confirm Ad details</p></figcaption></figure>

Step 8: Ad created successfully

<figure><img src="/files/PbVpajGKOOPWMLnErg6B" alt=""><figcaption><p>Fig. 1.7 Sell Ad</p></figcaption></figure>

{% embed url="<https://www.loom.com/share/d482095ad8374be9bf951a31ae32cb6a>" %}
How to sell on the P2P DApp
{% endembed %}


# How to Buy

P2P

A. How to buy by engaging a Buy Order

{% embed url="<https://www.loom.com/share/18756310e23043389d7d258e0e9d405c>" %}


# How to Sell

P2P

A. How to Sell by engaging a Sell Order

{% embed url="<https://www.loom.com/share/1fb2b4d2c1324faeb562b09e2c800a62>" %}


# Referral

P2P

You can earn bonuses by sharing your referral links in the following steps:

1. Connect Wallet: Connect your wallet to be able to trade on the platform.
2. Send Referral Link: Copy and send out your referral links to start receiving bonuses through referrals.
3. Earn Referral Bonuses: Earn calculated bonuses when those you referred trade on the platform instantly.

<figure><img src="/files/JQeqfyZTnTyZXr248Nkq" alt=""><figcaption><p>Fig. 1.0 Referral</p></figcaption></figure>


# Dispute

P2P

1. How to create a Dispute.

This video will show you how to create a Dispute:

{% embed url="<https://www.loom.com/share/636e484ade9c460493ed452d23918ba4>" %}
How to create a Dispute
{% endembed %}

2\. How to be a Dispute Council Member.

This video will show you how to become a Dispute council member so you can be eligible to join disputes, vote and earn tokens:

{% embed url="<https://www.loom.com/share/43af6e6356054cfc8bc93d18217db99e>" %}
How to be a Dispute Council Member
{% endembed %}

3\. How to Join Dispute and Vote as a Council Member.

This video will show you how to join Dispute, vote on a Dispute, and show the settling process for a Dispute:

{% embed url="<https://loom.com/share/d1034169d08d4dd29cccecdddd3eade8>" %}
Join Dispute, Voting, Settling
{% endembed %}


# P2P DApp: Mobile Version

A. The Rigel Protocol P2P DApp is a decentralized peer to peer non-custodial trading platform where Merchants can buy and sell Cryptocurrency.

<figure><img src="/files/Oo7Qk0ljTEtnWgJ9TziO" alt=""><figcaption><p>Fig. 1.0 P2P DApp</p></figcaption></figure>

B. What does the P2P DApp help users achieve?

* Direct exchange of crypto to fiat(150+ currencies).
* Direct exchange of fiat(150+ currencies) to crypto.
* Ease of crypto accessibility.
* Come into crypto with any fiat currency.

C. How does it work?&#x20;

* Trader Bob wants to buy [$RGP](https://twitter.com/search?q=%24RGP\&src=cashtag_click), Bob has just USD. Using the P2P DApp, Bob can easily buy [$RGP](https://twitter.com/search?q=%24RGP\&src=cashtag_click) or any token with USD.&#x20;
* Trader Ben wants to sell [$ROUTE](https://twitter.com/search?q=%24ROUTE\&src=cashtag_click) for fiat, Ben can easily convert [$ROUTE](https://twitter.com/search?q=%24ROUTE\&src=cashtag_click) to fiat in seconds.

<figure><img src="/files/UNE7YJq9hz1WxF4C1qNo" alt=""><figcaption><p>Fig. 1.1 How does it work?</p></figcaption></figure>

D. Benefits of being a Merchant on the P2P DApp

* Access to buyers.
* Non-custodial.
* Time based trades.
* Trade edits - Set price flexibility.
* Profits frim high trade volumes.
* Decentralized dispute resolutions.
* Enjoy the full WEB3 experience.

  <figure><img src="/files/uynAEKxS4h6IXuS9jgj8" alt=""><figcaption><p>Fig. 1.2 Benefits of a Merchant</p></figcaption></figure>

E. User and Merchant Video:

{% embed url="<https://youtu.be/ONGm1fQP3b0>" %}
Fig. 1.3 User and Merchant Video
{% endembed %}


# Connect Wallet

P2P

How to connect your Trust Wallet or Metamask Wallet on mobile using Wallet Connect.

{% embed url="<https://www.loom.com/share/3609d6279fe34b3f9a5a5c6740a07da9>" %}
Connect your wallet on Mobile
{% endembed %}


# Create an account

Step 1: Click on "Account" and click on "Profile" to create new account.

Step 2: Add "Name" and "Phone Number"

Step 3: Add Payment Method

Step 4: Add Payment Details

Step 5: Trade

Note: This is on the premise that your account was created successfully.

{% embed url="<https://www.loom.com/share/d644107541df4b37a2bcde3a1e1ffed2>" %}
How to create an account on Mobile
{% endembed %}


# Create a Buy Ad

P2P

A. How to buy by creating a Buy Order

&#x20;Step 1: Create a Buy Ad - Click on "Create a buy order" to create a Buy Ad.

Step 2: Trade Type and Price - Fill in details for type of trade, Crypto you want to buy, the Fiat currency you want to buy the Crypto in, and set to Fixed Price or Floating Price.

Step 3: Approved Quantity - Add specifications for Approved Quantity and Trade Limit and click on "Next".

Step 4: Payment Method - Add bank account details and specify payment time limit, and click on "Next".

Step 5: Automated Response - Add specific details that will be displayed to users as "Automated Response" and "Trade conditions" when they engage your ad.

Step 6: Confirm Ad details - View overall Ad details and confirm before clicking on "Confirmed, Post Ad" to post Ad.

Step 7: Ad Created Successfully.

{% embed url="<https://www.loom.com/share/2d97d7bd15a04d2ca3848a58ae14a2ac>" %}
How to create a Buy Ad on Mobile
{% endembed %}

{% embed url="<https://www.loom.com/share/780279ec2a434ac4a10ba066c1ac6071>" %}
How to buy on the P2P DApp
{% endembed %}


# Create a Sell Ad

P2P

A. How to Sell by Creating a Sell Order

Step 1: Create a Sell Ad - Click on "Create a sell order" to create a Sell Ad.

Step 2: Trade Type and Price - Fill in details for type of trade, Crypto you want to sell, the Fiat currency you want to sell the Crypto in, and set to Fixed Price or Floating Price.

Step 3: Approved Quantity - Add specifications for Approved Quantity and Trade Limit and click on "Approve RGP"

Step 4: Approve RGP on Wallet

Step 5: Payment Method - Add bank account details and specify payment time limit, and click on "Next".

Step 6: Automated Response - Add specific details that will be displayed to users as "Automated Response" and "Trade conditions" when they engage your ad.

Step 7: Confirm Ad details - View overall Ad details and confirm before clicking on "Confirmed, Post Ad" to post Ad.

Step 8: Ad created successfully

{% embed url="<https://www.loom.com/share/abc2db1856a749b792be1bb4415501aa>" %}
How to create a sell Ad on Mobile
{% endembed %}


# How to Buy

P2P

A. How to buy by engaging a Buy Order

{% embed url="<https://www.loom.com/share/dc774f49e48141a4b5f4e4464928fb3c>" %}
How to buy by engaging a buy Ad on Mobile
{% endembed %}


# How to Sell

P2P

A. How to Sell by engaging a Sell Order

{% embed url="<https://www.loom.com/share/045323cdca01402c926669f6c0236f30>" %}
How to sell by engaging a sell Ad on Mobile
{% endembed %}


# Referral

P2P

You can earn bonuses by sharing your referral links in the following steps:

1. Connect Wallet: Connect your wallet to be able to trade on the platform.
2. Send Referral Link: Copy and send out your referral links to start receiving bonuses through referrals.
3. Earn Referral Bonuses: Earn calculated bonuses when those you referred trade on the platform instantly.

<figure><img src="/files/w1AP70mBBPCWUV1hf16B" alt=""><figcaption><p>Fig. 1.0 Referral</p></figcaption></figure>


# Dispute

P2P

1. How to create a Dispute.

This video will show you how to create a Dispute:

{% embed url="<https://www.loom.com/share/636e484ade9c460493ed452d23918ba4>" %}
How to create a Dispute
{% endembed %}

2\. How to be a Dispute Council Member.

This video will show you how to become a Dispute council member so you can be eligible to join disputes, vote and earn tokens:

{% embed url="<https://www.loom.com/share/43af6e6356054cfc8bc93d18217db99e>" %}
How to be a Dispute Council Member
{% endembed %}

3\. How to Join Dispute and Vote as a Council Member.

This video will show you how to join Dispute, vote on a Dispute, and show the settling process for a Dispute:

{% embed url="<https://loom.com/share/d1034169d08d4dd29cccecdddd3eade8>" %}
Join Dispute, Voting, Settling
{% endembed %}


